Inspired by a photo in Dan Millsip's journal detailing the building of his kayak, I decided to build a device to help me scrape/sand smooth the inside seam in those hard to reach and curved portions of the kayak. Dan credits Daren Neufeld with the pole sanding device.
Here is the problem I'm trying to fix:
 In the photo above, the boat is upside down. The tip of the bow curves down and away from the camera (and the guy trying to work in the confined space). The seams are to the sides of the photo. Below are a couple of the closeups of the bumps and glass fibers which stick up (cropped from the right side of the above photo). The whole thing is a big mess of epoxy and fiberglass.
 I stopped by the local Co-Op hardware store on my way home to look for the highly & repeatedly recommended sureform rasp. Not finding one, I picked up some other rasp thing, designed for drywall but the package says it can be used for autobody work. It was cheap so I figured what the hell. I also picked up a couple of small hinges. Here is the first version of my inside seam tool, Inside Seam Tool, MKI:
 I fitted the rasp blade to a block of wood which was then attached via a small hinge to a 3 foot length of scrap spruce. This first version did not work very well for 2 reasons - the sole was too flat, and the rasp did not cut the fully cured epoxy very well. I fully expected both of these to be a problem so there were no suprises there. I attempted to curve the rasp but was not very successful and quickly tossed the rasp aside. It was a good thing I sharpened my plane blade last night because I put it to good use by planing down the sole of my block of wood to form a nicely curved surface. While I was at it, I planed down the square corners of the handle to give a handle that I can comfortably grip without fear of gaining a mitt full of splinters (working with a plane and a piece of wood is so much nicer than scraping cured epoxy & fiberglass). I then stapled a piece of 80 grit automotive sandpaper (from a Princess Auto variety pack) to the bottom and voila, Inside Seam Tool, MKII:
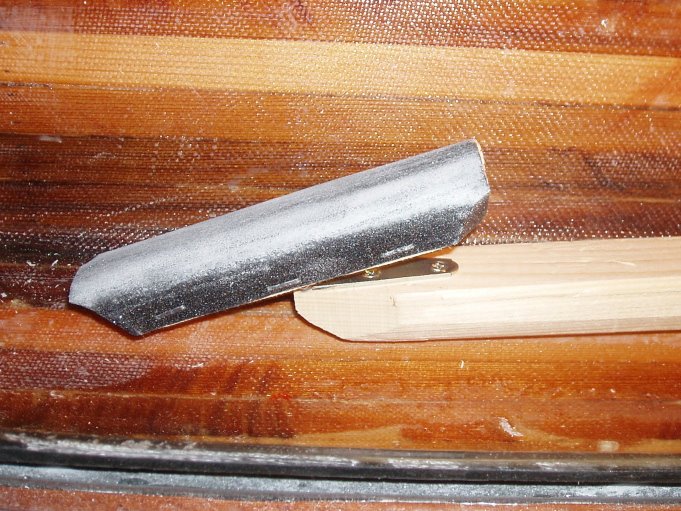 Thankfully, the rounded sanding version works much better. It's still gonna be a lot of work and rather slow, reaching with one arm in through the hatch with your head crammed in there too so you can see what you're doing, but my wife has indicated that she'd like to help with the kayak so maybe I can get her to do it.
No comments:
Post a Comment