Sunday, November 27, 2005

A Few Good Strips

Things have progressed rather slowly lately. We were out of town 2 weekends in a row, and our kids have been sick for the last week. Last night was the first time working on the boat in about 1 1/2 weeks and I now have 9 strips on the kayak.

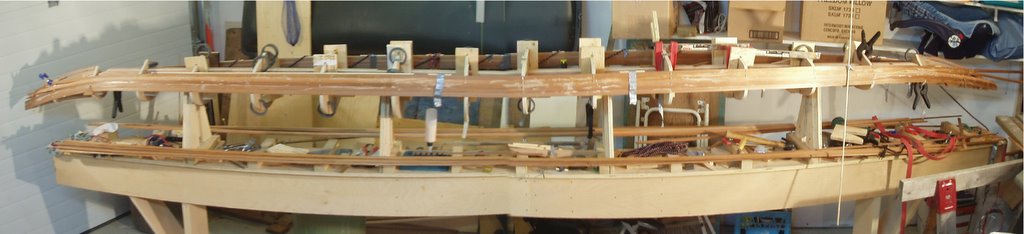
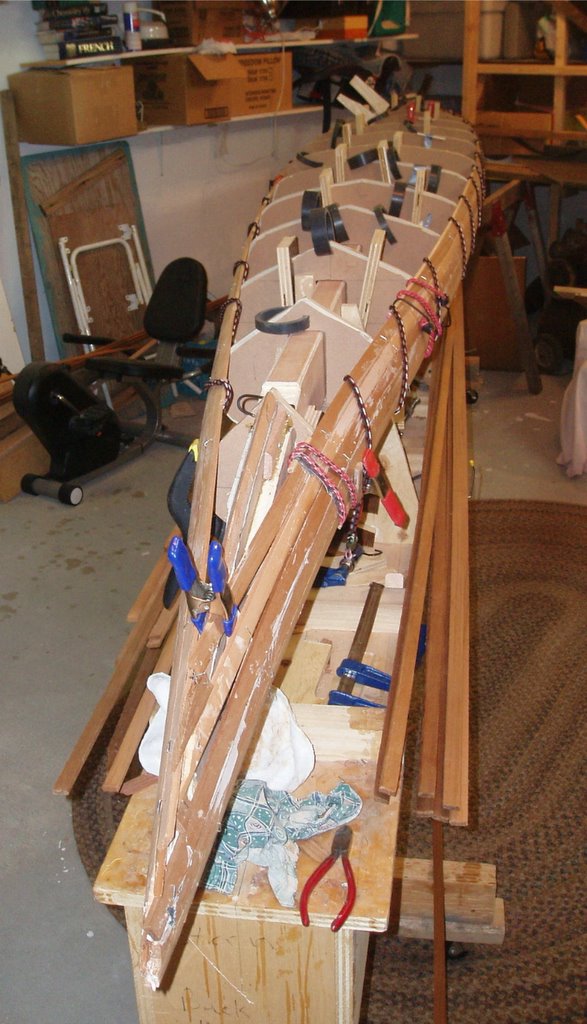
Below is a close-up of the bow and another photo of the kayak taken from the bow end. In these photos you can see gaps in the strips at the tip of the bow, each one strip wide. These gaps will be filled by "cheater strips" and allow curve of the subsequent strips to be reduced. I am using two cheater strips at the bow and one at the stern (which has less curve than the bow).

Things look pretty rough in these photos with the smeared glue looking white on the cedar wood. I expect that this residue will easily scrape/sand/plane off when I am smoothing things out later. The glue I am using is the Lee Valley 2002 GF glue, reported to blend well with the darker shades of cedar. I have been using a dry rag to wipe away the squeeze out. Now as I write this I am wondering if I shouldn't maybe be using a damp rag to clean away more of the residue. If you know if this is important or not, please let me know.

To this point I have been using strips that are less than the full length of the boat, joining two shorter strips with a butt joint somewhere towards the middle of the boat. (For more on butt joints and the strip length go here.) Now that I've come far enough up the side of the boat, the strips no longer need be quite so long and I should be able to use full length strips for the rest of the boat with the possible exception of a few deck strips (which will depend on the pattern I choose to strip the deck with). Actually, this was the major reason I eventually changed my mind & decided to use the cheater strips. (I was initially put off by the daunting task of trying to cut & insert the thin wedge-shaped pieces but this was overridden by my desire to decrease the amount of bend and to reach the point where I can start using full-length strips and not do the butt joints.) Without the cheater strips, I would need quite a few more strips longer than those I have.

Those that look closely may notice that there are a few more staples than would be expected after reading what I've written in earlier posts. Two weeks ago I had a visit from Martin Bernardin, canoe builder extraordinaire and proprietor of Kisseynew Canoe Company. He watched me screw around with all of the clamps and clamping jigs while I carefully put in place 1 or two strips. He was not impressed and commented that using staples he'd have "half the boat done by now". This certainly eroded my resolve to try to go without making too many staple holes in the boat. The next strips were done using a few staples and by the time I added the most recent strips I had abandoned the clamps in favour of staples, choosing instead to try to do a decent job with the staples and ensure I had tight joints. To this latter end, I am wrapping the strips with a long bungee cord in order to close the gaps that sometimes occur between the forms. The cove is protected by pieces of 1/4" dowel. The dark wood will liekly help to hide the staple holes on the finished boat and I will not likely try to hide them by filling them with sawdust & epoxy. Things did seem to go a fair bit more quickly than with the clamps but the process is still not fast.

That's it for today.

Friday, November 18, 2005

Tallies

Strips: 6 (3/side)
Staples: 26
Finishing Nails: 2
Hours: Best not to count

Thursday, November 10, 2005

Bryan Strips!

Well I got the first 2 strips on over the last couple of nights - one on each side of the boat along the sheer line. The bend at the bow and stern is tight and across the width of the strip so a heat gun was used to encourage the strips to bend. This worked well enough but it didn't exactly turn the strips into a wet noodle. The strips are held in place with a few staples here and there, packing tape, hot glue (at every station), and a few clamps. I am not really going staple-less but am trying to minimize the staple holes that I introduce. I consider the staple to be just another one of the tools I have available and I will use them when needed, along with tape, clamps, bungee cords, super glue, 4" screws, or whatever. Actually, I was not impressed with how easily the staples pulled out of the mdf forms and they did not do as well as I expected at holding the the strip in place on the forms close to the bow & stern where it twists as the strip curves downward, inward and becomes angled. The tips of the strips have been glued and clamped to the internal stem pieces carved earlier.

n.b. If you are scarfing together strips to make full-length pieces for the sheer strips, piece together two medium to short strips rather than tacking a couple of feet onto one that's almost long enough. Although it doesn't appear to have caused a problem, I realised last night that my scarf joints are right in the area that's bending and twisting the most and under the most stress. It would have been much better to have had this joint in the gently curving section towards the middle of the boat. The potential problem is that the jointed area of strip may not be quite as inclined to bend, or may not bend the same as the non-jointed regions on either side. Plus, the scarf would probably be less noticeable somewhere other than the bow & stern where the eye will be drawn.

After putting the first strip on, aligned with the sheer marked on each form, one of the forms appeared to sit slightly lower than the others. This was evident because the strip on that side dipped slightly at that spot. I put the strip onto the other side and that side seemed straight & fair. With the sheer strips attached to the forms, loosening the screws allowed the strips to shift the form into exactly the right spot, and remain there when the screws were re-tightened. Everything appears to be in good alignment now.

I can now start adding strips up the sides of the hull, using my sheer strips as a base.

Staple Tally: 8

Sunday, November 06, 2005

Almost ready to start

Well it's taking me a heckuva long time, but I think I'm almost ready to begin building this boat. Over the last week I have ..... ummm, I don't know, but it sure took a long time to do it.

1) I have made up about 30 c-shaped jigs that will be used to hold the strips in place while the glue dries.

2) I have cut a bunch of wedges out of scrap that will be used together with the jigs mentioned above. I still need to make more of these.

3) I found a use for the crappy peg board hooks that I was told would fit my slot wall in the garage but didn't even though I kept trying to use them to hold stuff on the wall and they kept falling off but I would curse and valiantly try to put them back up where they would stay until bumped slightly. [My advice - get slot wall hooks for your slot wall, don't try to "make do". And don't buy the hooks at the hardware store either, go to a place that sells store fixtures and pick up a bunch of used ones for cheap.] Now, what was I talking about? Oh yeah ... I drilled holes into the external strongback that the pegs of these hooks would fit into and voila, instant strip holders. I bent the end of some of the pegboard hooks in order to keep the strips from falling off. As a result, I now have a handy place to keep a small pile of strips on either side of the boat.

4) I put a strip-gluing holder onto the external strongback so that it will hold 3 strips at a time, cove side up, while I add the glue in preparation for their being placed on the forms.

5) I put masking tape on the edge of all of the forms so that the strips will not end up glued permanently to the forms.

6) I knocked the internal stems off of the bow and stern end forms (they were hot glued on) and then taped the end forms & sparingly re-hot glued the stem pieces in place. The way I had originally done it, the glue joint would have been too strong and I would have run into troubles trying to remove the forms from the kayak. As it is now I am hoping that the glue is strong enough to keep the stems in place during stripping, but weak enough to separate easily when the time comes to pull the hull off of the forms.

7.1) I scarfed some 16' pieces of cedar together with short pieces to make 4 strips about 18 feet long. The first strips that go on the boat are aligned with the "sheer" line - the line that defines where the deck and hull meet. On the guillemot kayak the sheer starts at the tip of the bow and curves down along the toward the middle, then back up towards the tip of the stern. According to the book, it is best to use full-length strips for this first strip since it is the one to which all others are aligned. My first attempt at scarfing strips "across the thickness" did not go well despite the able assistance of my uncle-in-law Barry. The trouble was that I am trying to do the cuts (on a steep angle of 1:7 or thereabouts) using a handsaw. The aforementioned book describes a method using a belt sander, which I do not have. My method was to clamp all the pieces together in a stack (8 pieces - two for each strip), and cut them on an angle (no mitre box) all at the same time with a japanese pull saw. Theoretically, this should mean that the strips end up cut with the same angle and should mate together nicely. I was wrong. Without a jig to keep the saw straight, the angle cut was not precise. I glued together the strips but after the glue dried I was unsatisfied with the results and cut them apart and started over. Part of the problem was also that the strips seem to have shifted after being clamped, something that was bound to happen since the strips were clamped on the bench but extended well beyond the bench and may have been bumped by the door when it was opened or by me as I worked in the shop.

7.2) On my second attempt to cut a decent scarf, I chose to cut across the width which proved to be a bit more manageable. I also did not set them up to glue until the very end of my work night in the shop so that I could not inadvertently bump them while I worked. This second attempt was somewhat more successful and produced a satisfactory (not great but it'll be OK) scarf on 2 out of 4 strips. That should give me the material I need to put on those first 2 strips (one each side) along the sheer line. If I'm gonna have to do this again, I really should build some sort of mitre box.

8) I have started to plane the bead off of the 2 strips that will be the first ones to go along the sheer line. Once that's finished (a few minutes?) I'll have to bevel the edge so that it is parallel to the floor when installed. This allows the deck and hull to meet flush without any gaps (theoretically). Once that's done, I'll have to fix that sheer strip in place (hot glue, staples, clamps) and I will at that point have officially begun to strip the kayak. Finally.